Welcome to my blog!

Thank you for visiting my blog about cards and other hobbies. Stamp Club is for anyone that would enjoy making cards and learning new techniques - we would love to have you come! We meet the first Saturday of each month or the following Monday (unless changed because of holidays). (Each monthly get together is held those two days - sometimes one day is more convenient than the other!) An Evite is sent out each month - so if you would like to come to Stamp Club, just email me and let me know to put you on the Evite list: helencashon@gmail.com . Sometimes we have Stamp-A-Stacks or other classes also.

Wednesday, January 19, 2011

Ornaments

Ornament Class

If you make ornaments, we found out that it was best to use the non-irredescent balls - can see the image inside better. 

This ornament is made with the City of David Stamp set - and two acetate images have been rolled up and inserted into the ornament ball.   They were stamped on the acetate in Black Staz On ink and then colored with Sharpie markers. 


Close - up (in can stand instead of on hanger).  One of the images is Joseph and Mary on donkey.  The other image in the background is the city of Bethlehem.   The filler on the bottom is pellet type "snow"  or  the kind of stuff that holds flowers upright in a vase.
This City of David ornament is CASED from vmaduzia on splitcoast.  See her ornament here
Directions for how to make ornaments are on splitcoaststampers under Resources. 


The set used in this ornament is Season of Grace.  Stamped in Versamark and then heat embossed in gold embossing powder.    The filler in the bottom is sand - bought a bottle of the sand that is used when sand painting.  This was light beige, I believe.  Earlier had used the pellet snow -- but when "Eddie" was talking about making some and we didn't have the snow - came up with the idea of the sand -- which makes more sense anyway.  There wasn't snow in Bethlehem!


From Season of Grace, heat embossed in gold.


My favorite - for some reason I have decided I like camels.  
From Come to Bethlehem stamp set.


Season of Grace stamp set.


From Holy Triptych stamp set.   We decided the pellet "snow" looked best with this angel.  This ornament turned out really pretty, we thought.  Again, as others above - stamped in Versamark and heat embossed with gold embossing powder.
This ornament also CASED from vmaduzia on splitcoaststampers.com.  She her ornament here.


This is an unpolished Porcelain ornament.   Edges sponged in Night of Navy (I think) and stamped with the Dasher stamp with same ink.  Very easy.   These ideas came from hmlopez.  See her gallery on splitcoast to see other variations.  Here is here copy of this one above.


Same ornament, but stamped in red ink.


Strips of designer series paper from Stampin' up!  Twirled in a spiral around a kid's paint brush handle.  The strip and spiral on the bottom show more detail about what is inside the ornament.  This CASED from
Joan Gross on Stampin' Connection dated 10/12/10.

Below is another way of using the designer series paper in the ornament.  This takes longer 12" strips rolled into a coil (vs. spiral as above).  Takes more to fill up the ornament because the coils take up less space than the spirals.  This CASED from kimber_327 on splitcoaststampers.   See her ornaments here.


This ornament CASED from 33 Rubberduck.  See her ornament on splitcoast here.


CASED from vmaduzia.  See her ornament here.   This makes a "snow globe."  See tutorial under Resources on splitcoaststampers.   Stand is a pop top fruit can (small, like in a six pack of fruit) covered with cardstock.  Stamp set is Merry and Bright stamped in Staz On, colored with Sharpies.


Not sure where this stamp is from. 


Believe this stamp is from Snowburst ...heat embossed in white.  A fluffy kind of snow is used in this ball.

Below are two other items I bought to experiment with stamping on.  The first is a kind of cardboard oval ornament. Stamp set is Dasher.


And this was actually glass.  I thought it plastic at first, but realized later when I was heating it to emboss the image onto it that it was glass.  Stamp set is Come to Bethlehem - heat embossed in white.

This photo above is a duplicate, but I don't know how to get it off.  I went to center it and it ended up at the bottom.  So I put it in again above, then found the other one at the bottom here...

Tuesday, January 18, 2011

Catch Up - December Stamp Club

Catching Up - December 4 and 6, 2010 Stamp Club

FAUX QUILT CARD

This Faux Quilt Card was fun!  Got addicting.  I tried it with several different colors and plain or designer paper.  CASED from LeeAnn Greff - see her card here.  Directions are on her posting there.


TILT CARD -

CASED from:  Debbie Currier.  See her card here on her blog.  Scroll about half way down.
Card is a Tilt Card.  Tutorial for Tilt Card on splitcoaststampers under Resoruces.  Bells are from Bells and Boughs set that was in the Holiday Mini along with designer paper from the Holiday mini.  Ribbon is the crochet ribbon from SU! Idea Book and Catalog. 


CLEAN AND SIMPLE SNOWFLAKE CARD

CASED from Petal Pusher (Mary Fish).  See her card here.   Snowflake punched out with the snowflake punch.  Gold glimmer brad. 


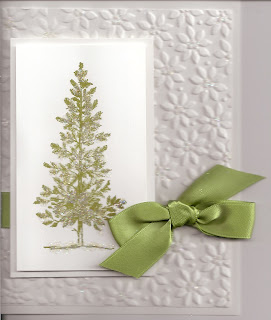
LOVELY AS A TREE WITH DAZZLING DIAMONDS CARD

CASED from:  Janice Sinko on Stampin' Connection September 6, 2010 - she indicated she originally cased from Robin Merriman.
Lovely As a Tree stamp set stamped in Old Olive.   Two Way Glue dabbed on tree and then sprinkled with Dazzling Diamonds.   Petals A Plenty embossing folder used on one of the layers. 


RUDOLPH BAG


CASED from:  Carry Vacanti - she used a button for the nose and part of the Tulip Die for the antlers.  I used the photo punch pieces - both large and small for the antlers - saw that on some other Rudolph creations.  Small scalloped top lunch bags from 2010 Holiday mini catalog.  


Catch Up -- November's Stamp Club

Catching Up - Stamp Club - November 6 and November 8, 2010


Card CASED from Sherry Barron on SU! Stamper's Showcase, October 12, 2010.  See her card here on her blog - scroll almost all the way to the bottom.   Her lesson, and hence my lesson, with this card - is that the rhinestones can be colored with Sharpie markers.   Regular markers do not work - the ink rubs off.  Changes from her card:  The colors of cardstock and DSP were changed and the ribbon omitted.  Here Cherry Cobbler polka dotted DSP from Jolly Holiday and Cherry Cobbler cardstock is used and well as Old Olive and Very Vanilla cardstock.  Medium rhinestone colored with red Sharpie.


Card CASED from Carrie Gazskin, although it has been simplified and sentiment treated differently.  See her card on her blog here.    The wreath is made up of the little teeny tiny hearts that you get when you use Stampin' Up!' s heart border punch.  Hearts were punched out of the following colors of cardstock:  Old Olive, Pumpkin Pie, Early Expresso, , Cherry Cobbler, Cajun Craze.  The ring for the wreath was made by punching out a circle with the Itty Bitty Circle Punch, then punching around it with the 1/2" circle punch on Early Expresso cardstock.   The ring is then coated with Tombow glue and the tiny hearts sprinkle on.  Then natural linen thread bow attached.   Panel and Modern Label pieces here are made with Cherry Cobbler cardstock; in class we used Cajun Craze.  Sentiment is from Teeny Tiny Wishes.

Card is cased from Mercy Kerin -- mkstampin74 on splitcoaststampers - uploaded there on October 13, 2009.  See her sample here on her blog. Technique is Ink, Spray, Smash.  Tutorial for Ink, Spray, Smash by Faith Hofrichter is on splitcoaststampers under Resources/Techniques.  Stampsets used are Serene Snowflakes and Teeny Tiny Wishes.   Cardstock colors are Tempting Turquoise, Melon Mambo, Rich Razzleberry and Whispher White, and Glossy White for the ink spray smash part.   Snowflakes heat embossed in gold. 


The From the Past project was Joseph's Coat.  CASED from France Martin - posted on splitcoast on October 23, 2010.  See her card here.   Once you get there, there is a link in the description to that and similar cards on her blog and a video tutorial there.   Stamp sets are Autumn Splendor and Thankful For.  Inside sentiment is from Seasonal Sentiments.  Card has a Very Vanilla cardstock base.  This card turns out beautiful in real life. 

Wednesday, January 12, 2011

January Stamp Club 1/8/11 and 1/10/11

The first card for January Stamp Club was a slider card - which proved to be a challenge.   I've got to play with it some more.  I had adjusted it some and moved the slider pieces out so the caterpillar could be longer.  I had made the slider pieces about 1/4" longer than the tutorial indicated, but no where in the info I was looking at did it say move the pieces out - that I experimented with on my own.  The second batch of Saturday's class we just left the slider pieces where the tutorial from http://www.splitcoaststampers.com/ indicated they should be.    The challenge after my adjustment was that the slider pieces didn't always want to go in and out like we wanted them to.  When we went back to the original instructions they seemed to do a little better.   Methinks I need to play with this card a little more if I want longer slider pieces -- maybe make them 5" instead of 4 1/4" long. 

Here is the card.   I thought it was really cute and just the thing to demostrate this type of card with Valentine's Day coming up.


Slider card closed.


Slider card open.

CASED from:  I believe the card I cased this from was created by lpratt.   Will come back and edit with more info and link when I find my papers.
Original tutorial for slider card on splitcoaststampers by Beate Johns.
Cardstock Stampin' Up! Whisper White base, More Mustard face with 1 3/8" circle punch, body 1" circles:  More Mustard, Pumpkin Pie, Real Red, Old Olive Pacific Point, Perfect Plum
Lettering is done with the Big Shot and the Billboard Alphabet decorative strip die.
The slider card had a lot of steps, so we only did one other card.


CASED from:   Was not able to find from whom I CASED this card.   I looked on splitcoast under the name of the stamp set and the date back in 2007 but was not able to find anything.  
Stamp Set:  Loads of Love for hearts; Teeny Tiny Wishes for sentiment
Cardstock:  Whisper White, Pretty in Pink, Real Red
Tag Punch and Small Tag Punch

Inside of card - not CASED
Stamp Set:  Blowing Kisses stamped in Real Red ink


FROM THE PAST was stamping on candles or better worded - adhering a stamped image on a candle. 
Tutorial is on splitcoaststampers - by Beate Johns.

Uh oh -- "love" is backwards!
Stamp Set is I {Heart} Hearts - stamped in Cherry Cobbler.
Note the heart on the left with the word love ... Erin noticed this -- we learn from my mistakes again!  : )
My mistake was in having the tissue paper turned over on the wrong side when I laid it against the candle -- so if you have words you're putting on a candle -- look at which side of the paper is against the candle and make sure the correct side is facing up towards you!
On Saturday we put these hearts on the taller 5 1/2" candle - it looks good on the taller one too!

I also made a sample candle using the I {Love} Love jumbo wheel and Real Red classic ink.
This was wheeled on a longer piece of  white tissue (the kind of tissue paper you use with gift bags).  Tissue paper and candle need to be white as the tissue melts into the candle.  It wouldn't look right being melted into say, a navy candle.

The two pictures show the two sides of the candle since we had a long image on a long piece of tissue paper which we cut at an appropriate place when the two ends of the tissue paper met in the back. 
We did learn, especially with this candle, that the tissue paper needs to be cut very close to the image - between 1/8" and 1/4" of an inch - closer to the 1/8".   We had some with a 1/2" unstamped border on the top and the bottom, and the edges did not melt into the candle very well, even when we went back and tried to concentrate on those areas. 

You lay the tissue paper on the candle and then wrap a piece of wax paper around the candle so that you can grip the ends of the wax paper - which also holds the tissue paper against the candle.   As indicated above - see the tutorial and video at splitcoaststampers.   

Putting the image on the candles really wasn't hard and didn't take long at all.  The other thing I learned, though, was work over a table protected with an old tablecloth.   The first candle I did I realized it was melting and dripping on the floor.  You probably don't need to get it that hot (don't need to get to the dripping point) -- you can kinda see the wax paper melting -- the stamped image gets darker and the wax paper shiny.

I had made candles a couple of years ago - but I printed a picture of Candi and Mark on a piece of tissue paper (ask me how - too long to explain here) and a picture of Trey and Inga on another and then melted those into the candle just like the stamped images above.  If I find a picture of those, I'll put on a later blog.


Saturday, January 1, 2011

Happy New Year 2011 everyone!

Auld Lang Syne - this touches me because of my Scottish heritage through Daddy (Julian McKnight).

Go to Playlist and turn MUTE on -- look for the small loudspeaker on the top right.   I also just found out how to shuffle the playlist songs so that they don't always play in the same order -- YAY!  -- I've been wanting to be able to do that for a LOOOONGGG time!  It is the thing that looks like backward C connected to forward C in the same genearl area  )(.   Look up above the mute area.


Auld Lang Syne was written by Robert Burns.  I think I probably knew he was a Scottish poet, but hadn't thought much about it.   

I've had this pulling for some time now to my Scottish roots -- I love Celtic music (not necessarily Scottish, but close) and for other things Scottish/Irish.  Earl and I love watching Celtic Women and I love to hear them sing in what I think is their native language. 

This version of Auld Lang Syne came through on email today and is beautiful.   She sings in Swedish.   One can click on a link at youtube and the words will display.  She sings the first verse in English and then the rest in Swedish.   Lover of words that I am, I enjoy looking at the words written in Swedish and hearing the pronunciation of them in the song.  This is by Sissel.  I have not heard of her before an email came today with this video in it, but I think I may look further into her music.


Speaking of music, Earl and I went to a John Berry Christmas concert at the Performing Arts Center at Georgia Southern University in late November or early December.  It was WONDERFUL!   It was truly a Christmas gift from him to the audience.  The second half of the concert was all Christmas songs, except the first, which was Celebrate Me Home, a song about welcoming back those in our military service.  There were a few secular Christmas songs, but overwhelmingly the songs were about Jesus' birth.   You could tell by those songs he chose to sing that they were his gift to those of us listening.  He shared his faith - not overbearingly, and not lightly - but just right.   One beautiful song was My Heart is Bethlehem.   I've ordered that CD and two Christmas ones.  One of the Christmas ones, to my delight, has him singing the Lord's Prayer.   Ever since we sang it years ago in church, I have loved the Lord's Prayer put to music.  It is beautiful sung.  I was not able to find The Lords Prayer on video to embed here, but did find

My Heart Is Bethlehem sung by John Berry: