Welcome to my blog!

Thank you for visiting my blog about cards and other hobbies. Stamp Club is for anyone that would enjoy making cards and learning new techniques - we would love to have you come! We meet the first Saturday of each month or the following Monday (unless changed because of holidays). (Each monthly get together is held those two days - sometimes one day is more convenient than the other!) An Evite is sent out each month - so if you would like to come to Stamp Club, just email me and let me know to put you on the Evite list: helencashon@gmail.com . Sometimes we have Stamp-A-Stacks or other classes also.

Friday, November 18, 2011

Stamp Club - November 5 and 7, 2011

November Stamp Club

All materials Stampin' Up!

Slide Up Cake Card
One of the cards we did for November was a slide up cake card.  
CASED from Lori Heling.  See her video:
http://stampingaddict.blogspot.com/
Look at sidebar and for Bring on the Cake

Front of card:


Inside of card.   Used Bring on the Cake Stamp set for the sentiments.  Just Add Cake Designer Series Paper.   Cupcake punch for the candles.  Tasteful Trim die and Big Shot for the zig zag on the front.


Burnished Leaves Card
CASED from Melisaa Davies
See http://www.rubberfunatics.blogspot.com/

Used Gently Falling Stamp Set, Classic Ink and sponge daubers - ink colors Pool Party, More Mustard, Always Artichoke, Soft Suede, and Pumpkin Pie.  Used Pewter Embossing Powder on this one.   We also, on some, used Chocolate Chip and Versamark Inks and then embossed with Clear Embossing Powder for a different look - one with the leaf outlines in brown.   Card Base and layer is River Rock; embossing folder used was Elegant Lines.


Punched Baked Turkey Card
Lynn Pratt - original designer
http://www.stampndesign.blogspot.com/
Posted November 5, 2010

Also Terri A. Ransom posted on Stampin' Connection October 25, 2011

This card DIRECTLY CASED from: 
Lori Heling posted on Stampin' Connection on October 21, 2011
http://www.stampingaddict.blogspot.com/


 Fork Bow Wreath Card
Learned Fork Bow from picture tutorial by Jennifer Timko
http://www.stampinonthefly.com/
also look under Tutorials on the right sidebar and see Quilted Bow - made with Potato Maker.  It is a triple bow.

I also did my own picture tutorial for the fork bow using a salad fork as originally instructed.  Then I tried it with a meat fork to get a wider bow.  Wreath is made by punching out a 1 3/8" hole in Garden Green cardstock and then punching over the hole with the 2 3/8" scalloped circle punch.  Bow is made from Cherry Cobbler seam binding.


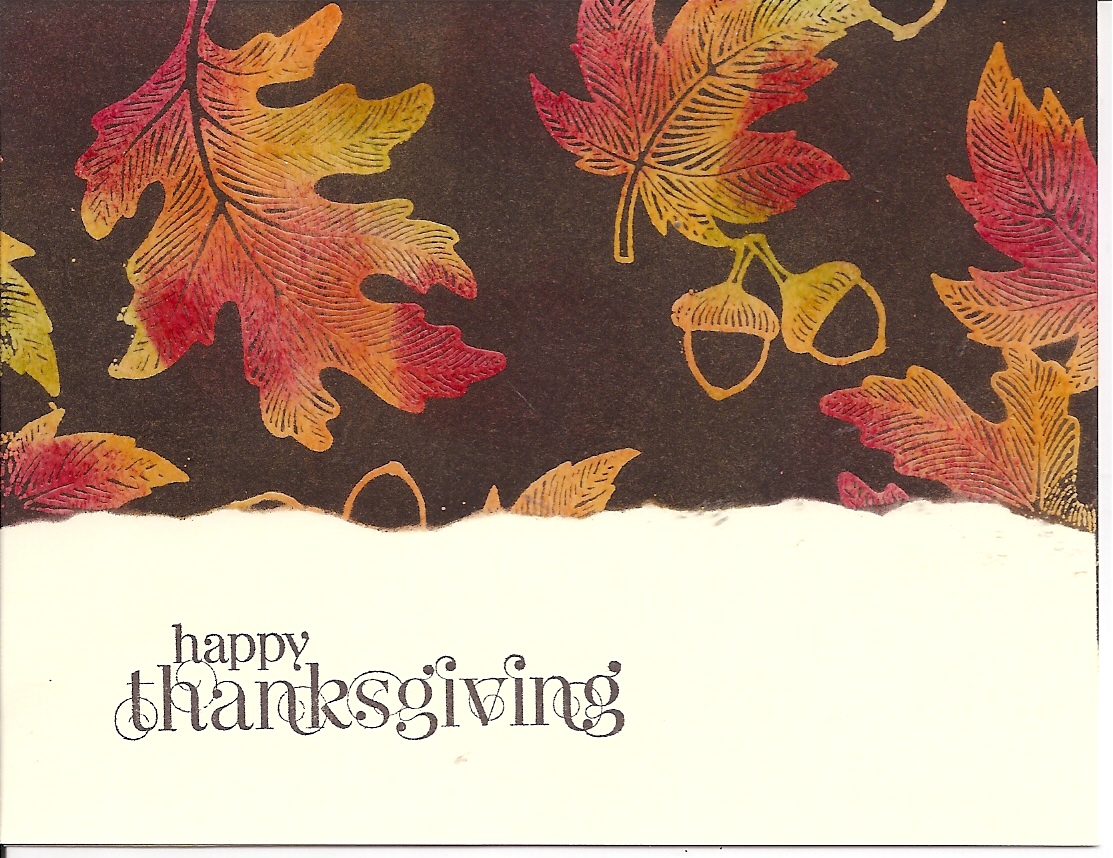
Joseph's Coat Happy Thanksgiving Card
This card was CASED from France Martin - posted on splitcoast on October 23, 2010.  See her card here.

This was another card a few of us made.  We made this same card November of 2010.  The technique is called Joseph's Coat.


Saturday, October 1, 2011

October Stamp Club

October Stamp Club
Saturday, October 1 and Monday, October 3

Pocket Silhouettes Card

CASED from beestamper on http://www.splitcoast stampers.com. Posted July 25, 2010.


Pennant Punch Banner Birthday Card

CASED from kthaman on http://www.splitcoaststampers.com . Posted on July 9, 2011

This is my favorite - I live the Daffodil Delight pennants and the Lucky Limeade background!  The pennant set and punch is pretty neat.  I've seen banners, Christmas trees, birthday hats, flags, sun rays, star, candy corn, boat sails, and ice cream cones made with this set/punch.  And the triangles put together in a mosaic.


Masculine Thank You Card

CASED from Kay Kalthoff in Stampin’ Connection. Posted March 6, 2011.
http://www.stampingtoshare.com/


Crimped Diamond Card

CASED from: Barb Calbick. Posted on Stampin’ Connection on October 24, 2010.
See also: scrapnforfun on splitcoaststampers.com
Dated September 8, 2010; and www.inkymoose.blogspot.com
Video tutorial: http://stampwithtami.com/blog/. On top right, click on Video Tutorials. It is near the bottom


Making the crimped diamond, as we found out, wasn't as difficult as it looks!  Makes a very interesting background, don't you think?

The ornament is from Tags til Christmas.  The ribbon is the new Quilted Satin ribbon that is in the Holiday Mini Catalog. 


This card we did not make - but had as a display card.  In looking at cards online, I saw this one - and saw that one of the stamps in the Four Frames set coordinates with the flower stamp in the Elements of Style set.

Card by Susan Carlson.  Posted on Stampin' Connection on April 18, 2011.


September and October Favors

Thought I'd share the favors that were given out at September Stamp Club and October Stamp Club.


These were the favors for September.   The cellophane bags are in the Holiday Mini.   They have a sticky strip on one end so you can seal the bag.    50 for $2.50. 
The topper is from a stamp set that is also in the Holiday Mini -- Gift Givers.  These have Skittles in them.

 Close up.

Pencils fit in the cellophane bags also!

 Farther out view of pencil.


Reeses Pieces - since Trey and Mark like those!   Haven't made the toppers yet.


October's favors.   Made with the stamp set It's A Wrap Holidays, designer paper, and labels like you get at office supply store.  Wrapped around Nuggets.

Thursday, September 15, 2011

September Stamp Club

September 10 and 12, 2011

All images Stampin' Up!


Pop Up Stage Card

CASED from Kim Score
See tutorial at http://www.splitcoaststampers.com/
Under Resources.


Inspired by Nature card

CASED from: territweety on splitcoaststampers.com dated July 20, 2010


Praying for You card

Spritzed

CASED from:  Robin Merriman


Shaker Card
CASED from Stampin' Up! Holiday Mini dated September 1, 2011 - January 3, 2012, Page 39.

Monday, September 5, 2011

From the Past for September 2011 - Shaker Card

Here is the Shaker Card we'll be making at Stamp Club on September 10 and 12 for those that wish to stay for From the Past at 2:00 p.m.    CASED from Holiday Mini, p. 39.

Tuesday, August 30, 2011

Michelle's Stamp-A-Stack 8.28.11

I went to a Stamp-A-Stack at a fellow demonstrator's house in Savannah last Saturday and thoroughly enjoyed it. We made 12 cards - 3 each of 4 designs. These are the cards we did. I am always impressed by her designs. This is the second Stamp-A-Stack I've attended at her house.  Thank you to Michelle Rahal for these cards. 

All images and supplies Stampin' Up!


 Autumn Days stamp set, Paisley Petals DSP, Calypso Coral and Crumb Cake cardstock.  Soft Suede Taffeta ribbon.  Embossing folder set:  Designer Frames.   (This is one of the two frames in the set.)  I left the sentiment off so I could choose which one I wanted to put on later.  Will stamp on white cardstock and punch out with Word Window Punch and adhere it over the Modern Label punched piece.


Field Flowers stamp set.   Rose Red and Old Olive cardstock.   Old Olive, Rose Red, and Pink Piroutte ink as well as black Staz-On ink for the sentiment.   Perfect Polka Dots embossing folder.


Sweet Floral background Stamp.  Stamped in Soft Suede.  Night of Navy, Soft Suede, and Whisper White cardstock. 


Big Top Birthday Designer Series Paper.   Real Red and Whisper White Cardstock.  Sentiment is from Perfectly Penned Stamp Set. 


Monday, August 29, 2011

August Stamp Club

August Stamp Club
August 6 and 8, 2011

All images and supplies Stampin' Up!


Split Level Easel Card

Direct CASE from Sharon Field
http://www.createdbyu.blogspot.com/


Pink Lace Ribbon Border Punch Frame

Coloring with Markers
Crystal Effects to give appearance of Glass

Cased from Donna of ButternutSageDesigns
Colors changed; middle image changed
Corners changed - just used pearls


Tempting Turquoise Rose Card with Embossed Oval

Cased from Gail Sachleben – Stampers’ Showcase, July 10, 2011. Rose changed.


July Stamp Club

July Stamp Club
July 9 and 11, 2011

All images and supplies Stampin' Up!

Paisley Prints Designer Series Paper and Four Frames Stamp Set Card
CASED from Linda Gutierrez.  Posted on Stampin' Connection April 14, 2011.
www.StampingYearRound.typepad.com


PAINTING WITH BLEACH

Card is a direct CASE from
Sandy Mathis on Stampin’
Connection May 28, 2011


Used Aquapainter (dedicated to bleach and labeled as such so wouldn't get mixed up with good ones later).   Heat embossed the flower and then painted inside the lines with full strength bleach.


FUNKY FOLD SHIP WHEEL CARD
CASED from:
Lorri Heiling on Stampin’ Connection on April 26, 2011. Help also obtained from video from
http://www.sweeetdesignsbycheryl.blogspot.com/ but adapted to 8 ½” x 11” cardstock.


June Stamp Club

June Stamp Club
June 4 and 6, 2011

All images and supplies Stampin' Up!

Faux Leather Card - Version 2 (using Fun Foam sheet)
Cased from:  Glenda Calkins (www.thestampcamp.com/blog)
and Chanda Stehlik (http://www.onecraftymommy.com/)
and Terry Morelli.   All on Stampin' Connection


Pull Tab Card
Cased from:  Patti Lee - posted on splitcoaststampers April 27, 2009
http://www.creationsbypatti.blogspot.com/


Postage Punch Quilt Card/Inlaid Embossing (Quilt Version 2)
CASED from:  Rosalie Dodge on Stampin' Connection April 29, 2011

This was the favorite card of the day.  Everybody LOVED it!


From the Past:
Gel Card and Fish made with Blossom Petals Punch and Build a Blossom Stamp Set

Fish CASED from:  Stampin' Connection:  Brenda Rouse, Charlotte Hollingsworth (http://www.stampingismytherapy/); Kim Moorehouse.
Wide Oval Punch opening also CASED, but don't remember from whom.  (Sorry)
Gel Card tutorial on Splitcoaststampers under Resources.


Monday, May 9, 2011

May Stamp Club

Stamp Club - May 7 and 9, 2011


Butterfly Easel Card

I think I first saw the butterfly part of the card, or rather a simplified one layer version, by Robin Merriman.  She made little butterfly notecards and used the designer paper on the top like we did here.   Also thanks to Michele Foerst who did an EXCELLENT  tutorial for this.   And the actual card design and colors (so our card was almost an exact case except for the Big Shot embossing) were by Laura Lipe:  http://www.smileslaura.blogspot.com/  .


I made Earl's Mom one of these for Mother's Day.  On her's - I punched a little Daffodil flower (like the punched flower on the pink card below in the middle of the scroll thing and put a lrge pearl in the middle and put that in the middle of the dotted butterfly above.   I also used a tiny pearl and put it at the bottom of the sentiment oval. 

Here is the card I made Earl's Mom for Mother's Day after our Saturday stamp club.   Note the pearls I mentioned above. 


On Monday - we made some sentiment adjustments since Mother's Day was past.


Inside Butterfly Easel Card


Strength & Hope Card
CASED card from Sherahl Weadon - posted April 20, 2011 on Stampin' Connection.

With purchase of each Strength and Hope set, Stampin' Up! will donate $2 to the Breast Cancer Research Foundation.  In the Summer Mini Catalog, there is a website listed for this foundation.   (This set is on the inside back page of the mini catalog.)

We changed this H (as the result of an uh-oh.  We stamped it on a piece of scrap white and punched it out with the 1 1/4" circle punch and then backed that with a 1 3/8" circle punched out of Regal Rose cardstock. 


Faux Leather, Version 1 - with masking tape
Tutorial by Beate Johns on http://www.splitcoaststampers.com/ under Resources. 


Never-Ending Card
Idea and directions from Tami White:  http://www.stampwithtami.com/

Stage 1 Open the flaps up and down. 

Stage 2 - When you've opened as instructed above, you see this.  On the finished card, Happy Birthday is stamped in Pear Pizzazz on the left hand Daffodil rectangle.

Stage 3- pull open the two sections that have the plain Daffodil Delight pieces to get this:


Stage 4- then pull up the top and bottom above to get this:


Open the above left and right pieces  like a  book - and we are back to the beginning again - and you can keep opening layers, and opening, and opening ... it's fun to play with!
Would recommend putting the designer paper pieces on with Dotto so that you can adjust them if you need be.   Depending on how you have card originally sitting in front of you changes how it opens.    You might want to start with the "open like a book" part because that seems more logical.   And when you do that, your Happy Birthday may end up on the right or upside down.  In other words, play with it til you get it like you want, then let the Dotto sit (it is supposed to be permanent after 24 hours) or put on with other adhesive.